Friday, July 14, 2017

DIY Spotless Engine Cleaning


Is your car over 5 years old? Theres a good chance it is, considering that the average age of a car on the road in the US is 11.4 years 
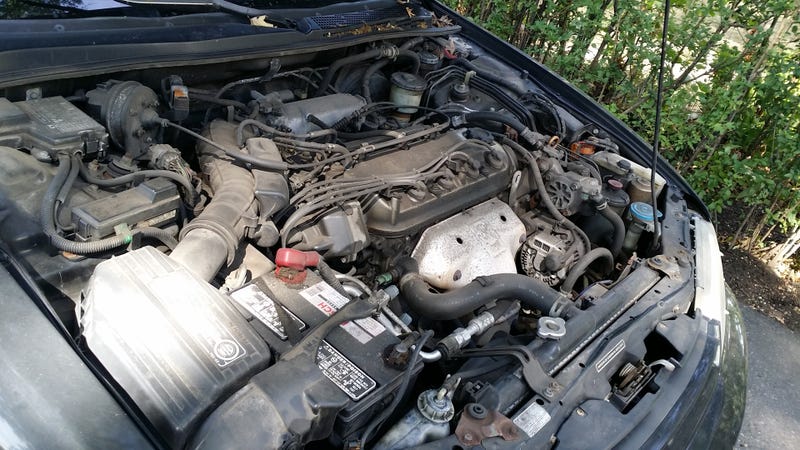
old. After thousands of miles driven and a multitude of services having been done, your engine bay is likely ridden with grime and dirt. Ive broken down on the side of the road a few times myself, and the last thing I want to do when Im in dire straits is get covered in car grease.

A clean engine bay will not only prevent you from getting greasy in a rut, but will also help your engine run at a cooler temperature and help keep everything else running smoothly. Cleaning your engine bay can be a quick and easy job, or you can go further and finely detail the bay almost as easily with just a little more time- for even greater satisfaction.


Im going to expound on the proper procedures in depth- you can decide how far you want to go with it based on your own standards/preference.

These are the supplies you will need; a vacuum, a leaf blower/air compressor, microfiber cloths, soapy water, degreaser, general cleaning wipes, and a versatile scrubbing brush.

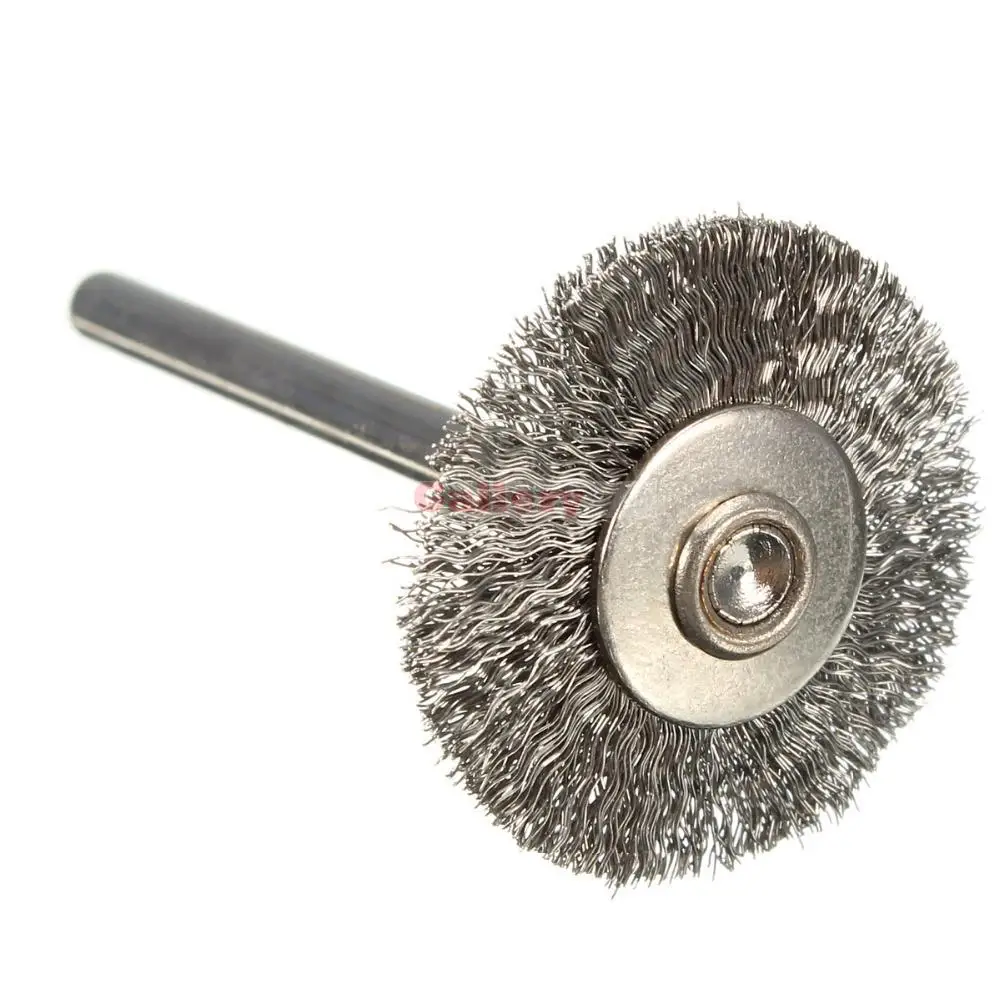
Optional supplies that can take it to a higher level are; brushes assorted by size, pipe cleaners, a metal wire brush/rotary tool, and a toothbrush.

Questions you may have about cleaning your engine could be;
How do I make sure I don’t damage the electronics? Does anything need to be covered or taken out? What products are safe to use? Does the water temperature matter?
These are all common concerns, and I will be sure to cover them throughout the description.

To begin, you’ll need to get prepared. Cover your eyes and hands and collect the necessary supplies. Disconnect and remove the battery. Tightly shut all of the reservoir caps.


Next, you’re going to do a dry clean. There’s likely going to be a large amount of loose dirt and debris that can be easily brushed loose and vacuumed right off.


After vacuuming, take your air blowing device- an air compressor works best but a leaf blower or vacuum on the blow setting could also do the job- and blow away the excess debris you’ve brushed off. If there is any dull aluminum or metal, it can be brought back to life by scrubbing it with a metal wire brush or a rotary tool with a wire wheel. Youll want to blow off the loose debris after this step as well.


Next comes the wet. Any water temperature will be okay if your engine is cool, but warm water will make the washing easier. If your engine is hot, wait until you can rest your hand on the engine block until you put any water on it. If it’s warm, you may proceed- but only with warm water, as cold water on a hot engine could result in cracked or warped parts.

Be sure to cover the engine prior to spraying anything, as the electrical parts within such as the alternator, distributor, and spark plug wells should all be exposed to minimal water.


Spray the entire exposed bay down with water, and use a cleaning wipe to sop up the excess water and lifted dirt. Spray all over again, with degreaser this time, and use your brush and/or pipe cleaner to scrub all of the surfaces. Rinse with water, and wipe away anything thats left with a microfiber cloth.


Next, take the plastic off of the engine. Removing the intake can make this part much easier, so do this if youre confident in properly removing and replacing it. This should be evident, but removing any parts from your engine bay should always be done with care.


Now, start by cleaning the top layer of grease off of the tubes and such around your engine with cleaning wipes. Lightly mist the area with soapy water and agitate with a brush. A small brush or pipe cleaner would be the best size for this area. Absorb the soapy water and dirt with a microfiber towel, being sure to soak up any excess moisture. A vacuum with water capabilities would work wonders to get any leftover water out of hard to reach places.

To finish, buff the entire surface with a cloth until a delightfully alluring gleam is achieved, and thats a wrap!

Your engine should now be looking just as fresh and new as it did when it was a wee babe! 

Tuesday, May 2, 2017

Toss That Lemon


Thanks to an increasingly better economy, many Americans are expected to be trading in their old lemons for something newer and nicer this year. When one starts to ponder the possibility of buying a car, the initial thought is likely to be a matter of the preferred body style and brand. Another key aspect of buying a car to consider, however, would be whether you’re best fit is going to be brand new, certified pre-owned, or an old gem.

As the economy steadily inclines, automakers are continuously making innovations in their designs through better technology, more safety and above all else-convenience. Due to these advancements, the price of a new car has risen by 11% since 2011.

That’s likely going to be pushing it for the more frugally inclined families in the market this year. Many consumers are acquiring more buying power and sales savvy, making the car market even more competitive- and pushing the price tags even higher.

New cars are liable to get pretty pricey this year, and yet the fact remains that a third of the value flies out the window as your driving off the lot. Exceptionally savvy customers realize this and will be making their first stop, and likely the last, at a pre-owned lot. For those of you who still want a piece of that technological pie, a used car lot can sell a car from the previous year with as few as 100 miles on it with a huge discount.

2017 Mercedes E-Class at Drivers Choice

Used car sales are expected to boom this year, thus you can expect to see dealerships bulking up their lots with more pre-owned vehicles than ever. This will prove to be quite advantageous for the penny pinchers and deal hunters abound, as prices are apt to get more reasonable with the anticipated influx of business as well.

Your Drivers Choice dealer features an exceptionally flourishing inventory with a huge variety, and it’s going to be hard to beat the convenience and savings we have to offer this year. See the scale for yourself at our inventory page, where you can find the best car for your lifestyle and budget. 

Friday, April 28, 2017

How to Clay Your Car

Claying your car is a great way to profoundly enhance the smoothness of your car. If car claying is a foreign concept to you, it may sound like a complex process reserved for professionals with experience and expensive equipment. However, car claying is actually quite simple and only requires a few easily obtainable resources.


You will need the following materials; an auto detailing clay bar, a wash mitt, spray wax (or clay lube), car soap, a bucket, and a hose. It shouldn’t be too hard for most to find a hose and bucket, and the aforementioned materials can be acquired for around $30.

An auto detailing clay bar is similar to the sculpting material, but has been specially designed to be elastic and durable enough to enable the clay to be stretched, smashed, and rinsed repeatedly. It’s also able to withstand the tougher types of contaminants that your car is likely to encounter; such as metals, glass, fiberglass, and other resilient materials that regular car washing won’t remove.


Start by gently washing your car conventionally, reserving or replacing the soapy water for future steps. Cut off about a third of the clay bar and store the remaining clay in an air tight container. Then, knead the clay into a shape that can easily be rubbed against the car, similar to a hamburger patty, and drop the clay into the soapy bucket.

Soak up some soapy water with the wash mitt and use your non-denominate hand to squeeze the water onto the panel to be cleaned. Quickly spray a shot of car wax/clay lube onto the wet surface, and then gently place the clay bar on top. Lightly move the clay bar in short, side-to-side motions at a quick speed. Once it becomes noticeably easier to move the clay bar, move on to the next area.


As you clean your car, periodically knead the clay bar and ensure that there aren’t any jutting contaminants, as they could scratch your cars paint. Once youre finished with a section of the car, be sure to quickly rewash and rinse the clayed area. When the entire car has been clayed, simply rinse, dry, and seal the surface.

And that’s it! Claying your car is quick, easy, inexpensive, and seriously effective. If you intend to reuse the clay bar, be sure to knead it in cool water to release the cleaning products and contaminants prior to storage.

How to Clean Your Soft Top

Cleaning your soft top convertibles sensitive material may seem daunting, but it is surprisingly easy to do without tarnishing or devaluing the delicate fabric, and primarily requires rudimentary equipment/materials.

The first step is to rinse the top layer with a hose or pressure washer, which should remove a good portion on the surface dirt. If you’re using a pressure washer, be sure to keep the nozzle at least a foot away from the fabric to prevent damage. Blot dry with a microfiber towel or gently use a vacuum to blow dry, and then reassess the dirtiness of the material.

Next, spray a suitable amount of fabric cleaner over a workable area and use a soft bristle interior brush to bring the soap to lather. Avoid typical car wash mitts, as they break down and can potentially leave lint embedded in the fabric. Once the soap is lathered, use straight motions side to side and up and down to clean. If the top is particularly dirty, a firmer brush may need to be used.

Once you’ve covered the entire surface, give it a rinse with water and repeat the process as many times as necessary. Once the material is clean, dry with a Vac ‘N’ Blo or similar blowing device such as a leaf blower. Blot any access moisture with a microfiber cloth. It’s key to avoid using terry towels or the like as they will break down and leave residue embedded in the fabric, similar to what a typical wash mitt would do.

Once completely dry, spray 3 thin layers of Fabric Guard over the entire top. Use a slow and concise method similar to painting to avoid any running or dripping. Note the drying time in the directions for the product you use, and be sure to avoid contact with the fabric during that time. And you’re finished! Continue to take dutiful care of your delicate soft top, and you can expect to enjoy you’re beautiful convertible in mint condition for many years to come.


Monday, March 27, 2017

Drivers Choice Forgives Your Credit


There are many pitfalls lurking in the financial universe waiting to plummet your delicate credit score. As it is so unnervingly easy to blemish your credit, it’s quite possible that a financially wise person will have less than perfect credit. Drivers choice understands that life happens, and takes the first step in instilling trust.

There are just three things needed in order to get your approval; you need to have a valid drivers license, your gross monthly income must be over $800, and you need to have Auto Insurance. It’s that simple! If you meet the criteria above, the next step is to come in for your quick trade appraisal and/or test drive.


Drivers Choice has the advantage of possessing the largest inventory of quality vehicles in the Quad cities, as well as a multitude of local and national lenders that enables us to be more flexible on your behalf. Our credible lenders report to all credit bureaus to patently improve your credit score, no matter where you’re starting out!

For added piece of mind, all of our vehicles have been inspected and come with a guaranteed warranty.


Visit us here to schedule your test drive, or peruse our vast selection of quality vehicles right here.

Monday, March 20, 2017

All Season Tires vs. Summer/Winter Tires


For those of us with four radically different seasons in the year, we can always expect to encounter radically different roads as well. Yet, often times, cars are sold off the lot sporting “all-season” tires. One could easily assume that their all season tires are capable of handling hot summer pavement and winter ice the same as specifically designed tires would be. This is unfortunately due to a misrepresentation of all season tires combined with a general lack of basic tire knowledge abound.

 All season tires do indeed contain a portion of the needed qualities for summer and winter grip alike. With compromise, however, comes sacrifice. All season tires are lacking fundamental qualities of BOTH tires ideal for their assigned season.

There are multiple categories of tire composition- each one responsible for a faucet of the tires performance. As far as weather handling goes, key factors are going to be the tire treads rubber composition, depth, patterns, and edges.


Summer tires — known simply as “tires” before all-season tire use became widespread — are currently marketed as “performance” or “high-performance” tires. The tread is generally comprised of large tread blocks with high lateral stiffness, while wide circumferential grooves expel and sequester water. The rubber formulation is calibrated for firmness and isn’t nearly malleable to efficiently tackle slick roads.


Snow tires, on the other hand, utilize rubber compounds specifically formulated to produce grip at low temperatures and a tread that features a pattern of elements that are designed to physically bite into snow. A network of hair-thin cuts — known as “sipes” — crisscrosses the tread blocks, subdividing them into numerous edges for added grip. The result is a squishier, less stable tread than you'd see on any summer tire.

Now, because all-season tires are perceived as the do it all tires, this means that all season tires are expected to satiate an infeasible amount of criteria. If you experience the extremes of winter, mounting winter tires isn’t an over-the-top precaution – it’s an essential safety measure that could save your life.


You can receive additional information, get updates, or schedule a test drive with us- here.

Thanks for reading!

Tuesday, February 28, 2017

Put a Penny in your Tire!

As we bid another bone chilling February adieu, we welcome in the fresh spring air, basketball madness, and Girl Scout cookies of March. Although the ice and snow have left (fingers crossed) there are still some potential road discrepancies that drivers need to be conscious of to assert road safety.

We can expect plenty of cloudy days and nightly showers this month; hence we can expect to combat wet roads. One of the most important things to be mindful of during the rainy season is the tread and overall condition of your tires. Be aware of how your car alerts you of tire issues, or whether or not it does so at all. If your tires look low, you can find the manufacturers recommended tire pressure for your car on a sticker in the door jam or in your owner’s manual. If you don’t have any indication, the optimum pressure is normally between 30-35 psi.

Another imperative thing to be mindful of is the tread of your tires. Without proper tire tread, your car is much more liable to slide out of control on slick roads. An easy way to check this is to simply insert a penny into the groove of your tire with Lincolns head upside down and facing you. If you can see all of Lincolns head, your tread is dangerously low and your tires should be replaced for optimum control on the road.

A key note for this season that’s just as important as tire quality is the effectiveness of your brakes. Working brakes are an imperative aspect of your car during any season, particularly so when road conditions vary day to day.  Brake wear is considered an indeterminate science because it varies between different vehicles, driving styles, and your general road conditions. Your brakes can last up to 70,000 miles, yet could need to be replaced as soon as 25,000 miles. Be nice to your brakes; gradually come to a stop whenever possible and refrain from holding your brakes for extended periods of time. If you feel your car jerking or can hear a squealing sound as your braking, it could be time to have them replaced.

Be mindful of your cars condition and the cues your car gives you so you can always maintain control on the road and ensure safe travels. It’s also up to you, dear driver, to watch the road and practice safe driving habits. 

Beware the Pothole


We’re all too familiar with the danger of potholes around here. After the continuous freezing and thawing of water under the road; the pavement weakens, causing cracks that will be worn down and corroded into potholes. Deep cracks and potholes can cause serious damage to your car- some of them comparable to an accident at 35 mph. In addition to damage to the tire itself, a pothole can cause further damage to your car if your tires are over or under inflated.


If you frequently find yourself driving over potholes, your car could be due for an alignment. Luckily, there are a couple of easy ways you can check the alignment of your car. Things to look for include; uneven tread wear, your vehicle pulling to the left or right, an off center steering wheel when driving straight, or peculiar steering wheel vibration. 


Getting your tires aligned can help your tires perform properly and help them last longer. It also improves handling and keeps your car from veering off to the side or vibrating strangely on the road. If you don’t have any immediate concerns, simply have it checked every 6,000 miles or so, give or take depending on your daily driving conditions.

Monday, January 30, 2017

Detail the exterior like a Pro!

                  Everyone like a clean vehicle, however sometimes having the professionals do it can be expensive and difficult to get an appointment. Here at 12 tips on how to deep clean the interior your car cheaply and effectively.


·         Super Clean  Your Windshield
o   You can deep clean your windshield and remove all the built up grim associated with day to day driving, by going over your windshield with glass cleaner and steel wool, and then treating your windshield with Rain X. You can clean your windshield a couple times a year like this.
·         Renew your Wipers
o   You can renew your wiper blades and keep them from smearing by rubbing them down with rubbing alcohol pads.
·         Get Bugs off of your Grill and Bumper
o   You can remove stubborn bugs out of your grille and your bumper, with the help of dryer sheets. Soak it in warm water, and wipe.
·         Make your Cloudy Headlights Shine Again
o   Shine up cloudy headlights with toothpaste and water. Dilute a little toothpaste in warm water and scrub with a brush then wipe clean.
·         Clean the Top of your Windows
o   Remember to roll down your windows before you start wiping them with glass cleaner.
·         Make your Rims Shine!
o   Use a cleaning powder like Ajax and water to clean your wheels. Dump powder in water, apply to rims with a brush. Scrub off brake dust and grim.
·         Wash with the right Soap
o   Make sure to use car wash soap on your vehicle. Dish soap can do the trick in a pinch, but continual use, can take minerals out of the paint and cause the finish to lose its shine over time.
·         Use a Clay Bar
o   After washing your vehicle, use a clay bar and formulated spray remove bit of grime and gunk that were missed in washing and rinsing.
·         Wax to a Shine

o   Get a synthetic polymer wax and rub in with the foam applicator and rub into the finish using a swirling motion. Follow up with a microfiber towel to wipe off the haze. Have multiple towels to rotate out as they each fill up with used wax.


                We hope that these tips help you with keeping the inside of your car clean. But as always Diver’s Choice is here to take care of all your pre-owned car needs. Contact us today to set any appointment you may need.

Detail your Interior like a Pro!

                Everyone likes a clean vehicle, however sometimes having the professionals do it can be expensive and difficult to get an appointment. Here at 12 tips on how to deep clean the interior your car cheaply and effectively.


·         Use a Cheap Foam Brush or Paint Brush to Dust between the AC Vents.
o   Using a brush allows you to get into the difficult tight crevasses where dirt likes to stick.
·         Vacuum Dust and Dirt as You Brush it Out.
o   Use a vacuum as you brush the dust and dirt out of tight areas, this prevents it from landing on other area, causing extra work. Use this combination on all buttons and knobs to get dirt out of their edging.
·         Replace the Cabin Air Filter
o   By removing and replacing the cabin air filter, you can remove potential smells that could be lingering in your vehicle.
·         Use a Magic Eraser to Remove Sticky Substances from Leather/Vinyl
o   You can use a Magic Eraser with a little bit of water to remove gross and sticky substances form you leather and vinyl. Be sure to not scrub to hard, as you could potentially damage the material that you are trying to clean.
·         Use a Toothbrush to Clean Textured Areas
o   By using an old toothbrush with a bit of dish soap, you can thoroughly clean high traffic, textured areas, with a little elbow grease.
·         Use Olive Oil to Condition Leather
o   Over time, leather can become faded and distressed, you can use a little olive oil and a non-abrasive rag to recondition without spending an arm and a leg of high end products.
·         Remove Pet Hair with a Squeegee
o   You can easily remove stubborn pet hair from your cloth interior but misting the area with water and then running a squeegee over the area. The pet clumps up and can easily be vacuumed or picked up.
·         Use a Fine Bristled Brush to remove Dirt and Crumbs from Seams
o   Getting those fine crumbs and dirt out of the seams in your seats can be difficult. Take a fine bristled brush or toothbrush, and brush the dirt out. Use a vacuum at the same time to quick removal.
·         Use Paper and an Iron to Remove Wax
o   Anyone with children has experienced a crayon left on the back seat in the middle of August. You can easily remove this melted wax by running an iron over a sheet of paper on the effected area.
·         Shampoo the Seats using All-Purpose Cleaner
o   You can easily clean cloth interior of your car using a diluted all-purpose cleaner, a sponge or scrub brush, and washcloths. Spray on the cleaned, scrub and then bloat with a white or un-dyed washcloth or towel.
·         Use the Washing Machine to Clean Your Floor Mats
o   Spray your dirty floor mats with a stain remover, and then use a scrub brush to get deep on the tough stains. Wash on normal cycle in the washer, air dry.
·         Create Your Own Air Freshener
o   Take a mason jar, put burlap under the screw on ring, fill with baking soda and add a couple drops of peppermint or lavender oil! Easy home-made air freshener!


                We hope that these tips help you with keeping the inside of your car clean. But as always Diver’s Choice is here to take care of all your pre-owned car needs. Contact us today to set any appointment you may need.